
How Can We Help?
Getting Started – for administrators
To get started please follow the steps below:
- Create an account for churchscheduling.com application by clicking on the “User Registration” link
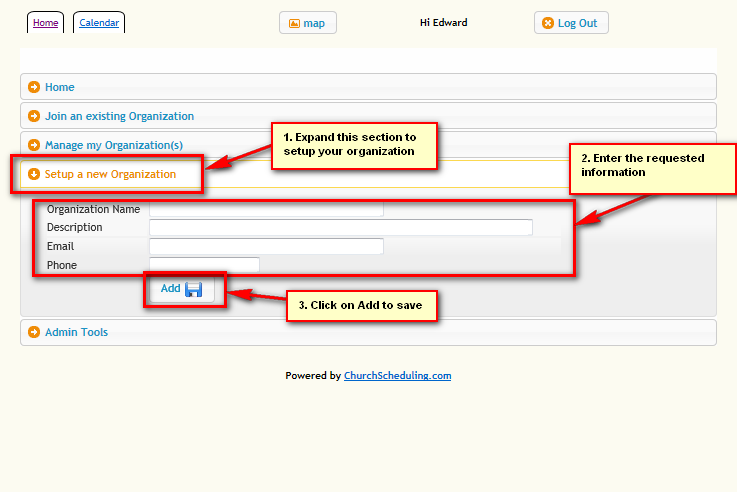
– Fill out and submit the Registration form (select setup a new organization for Registration Type dropdown) - Register your Organization After confirming registration, log in to the application and click on “Setup a new Organization” link.
- Initial Organization setup The application hierarchy is as follows:
- Organization
- Location – a specific branch of the organization
- Activity/Event – the service or event that needs to be planned and scheduled (i.e. Sunday 1st Service)
-> Activity Workgroup – the skill group needed for the Activities (i.e. Sanctuary Ushers, Parking lot Ushers, etc.) - Activity Instance – specific date and time for the Activity (i.e. Sunday 1st Service on December 25th, 2013)
- Activity Instance Workgroup – specific workgroup for the Activity Instance (i.e. Sanctuary Ushers on December 25th, 2013) To setup an organization,
- Create a location by clicking on the “Manage my Organization(s)” section
Click on “View/Edit” button next to your Organization name
Click on “Create new Location” button, on the pop-up window, enter the name for your current branch or location
After saving the new location, you will be redirected to the Location detail page. Note: you should also now have an admin menu at the top of the page. - After completing the setup for the Location details, you can use the admin buttons on the page to navigate to the remaining steps
*note: you can also utilize the Admin menu at the top of the page to complete the remainder of the setup. - Create the necessary skills (i.e. Guitarist, Pianist, Usher, etc.)
- Create Activity (i.e. Sunday 1st Service)
Add the necessary workgroups to this activity. Workgroups allow you to specify the skills and the number of volunteers needed.
Add the recurrence (when/how often the event occurs) Add the scheduling rules if necessary - Add Volunteers/Users – add the initial volunteers that you are looking to schedule.
Be sure to update volunteer availability and scheduling prefereces if necessary - Go to the Manage Activity page, edit the Activity created in the previous step
Turn on the Auto-scheduling feature by selecting enable in the dropdown - Save your settings.